Common Administration Task
Managing Printers
print queue folder
/var/spool/cups
To see a list of all printers on the system and their status
lpstat -t
cupsaccept printername
cupsdisable printername
cupsreject
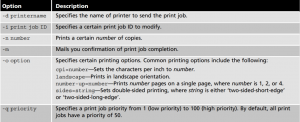
Print to a printer
lp -d printername /etc/inittab # this prints the inittab file
# the -d commandspecify the destination printer name
lpoptions -d printername # sets default printer
This information is stored in the /etc/cups/lpotions file Print multiple files
lp -d printername /etc/host /etc/issue
The lp command accepts information for standard inputs, thus you can place the lp command at the end of a pipe to print info
ls -la | lp -d printername
To see a list of print jobs in the queue
lpstat
Remove a print job from the queue
cancel jobid1 jobid2 # cancels 2 jobs
cancel -a printername
The file that contains the configuration information for each printer
/etc/cups/printers.conf
config for the cups deamon
/etc/cups/cupsd.conf
You can access the CUPS Web administration tool using a Web browser on TCP port 631 by navigating to http://servername:631,
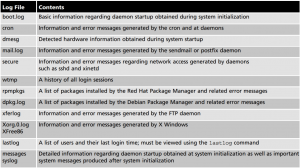
Log File Administration
Log files are stored in the
/var/log
Working with the System Log Daemon The System Log Daemon (rsyslogd) is the traditional and most common logging daemon used on Linux systems. When this daemon is loaded upon system startup, it creates a socket (/dev/log) for other system processes to write to. It then reads any information written to this socket and saves the information in the appropriate log file according to entries in the /etc/rsyslog.conf file and any files within the /etc/rsyslog.d directory.
journalctl
Managing User Accounts
Get info on a user
finger sysadmin
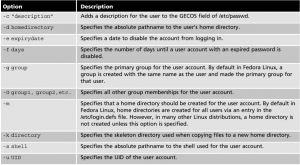
Create user accounts
useradd name
This file contains parameters that set the default location for e-mail, pass- word expiration information, minimum password length, and the range of UIDs and GIDs available for use. In addition, it determines whether home directories will be automatically made during user creation, as well as the password hash algorithm used to store passwords within /etc/shadow.
/etc/login.defs
The second file, /etc/default/useradd, contains information regarding the default primary group, the location of home directories, the default number of days to disable accounts with expired passwords, the date to disable user accounts, the shell used, and the skeleton direc- tory used. The skeleton directory, which is /etc/skel on most Linux systems, contains files that are copied to all new users’ home directories when the home directory is created. Most of these files are environment files, such as .bash_profile and .bashrc.
To set the password, simply type the passwd command, type the name of the new user account at a command prompt, and then supply the appropriate password when prompted. An example of setting the password for the bobg user is shown in the following:
passwd name
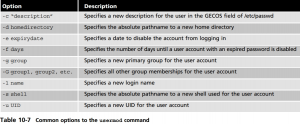
change the login name of the user
usermod -l john johnb
Sometimes it’s necessary to lock an account—that is, to temporarily prevent a user from logging in. To lock an account, you can use the command usermod –L username at the command 10 prompt. This places a ! character at the beginning of the encrypted password field in the /etc/shadow file. To unlock the account, simply type usermod –U username at the command prompt, which removes the ! character from the password field in the /etc/shadow file. Alternatively, you can use the passwd –l username command to lock a user account, and the passwd –u username command to unlock a user account.
Deleting user Accounts
To delete a user account, you can use the userdel command and specify the user name as an argument. This removes entries from the /etc/passwd and /etc/shadow files corresponding to the user account. Furthermore, you can specify the –r option to the userdel command to remove the home directory for the user and all of its contents. When a user account is deleted, any files that were previously owned by the user become owned by a number that represents the UID of the deleted user. Any future user account that is given the same UID then becomes the owner of those files.
userdel john
Managing Groups
By far, the easiest way to add groups to a system is to edit the /etc/group file using a text edi- tor. Another method is to use the groupadd command. To add a group called group1 to the system and assign it a GID of 492, you can use the following command
groupadd -g 492 group1
Then, you can use the -G option to the usermod command to add members to the group. To add the user maryj to this group and view the addition, you can use the following usermod command:
usermod –G group1 mary
To see a list of groups you are a memeber of
groups
newgrp # temp switch groups


